
DIY Remote control for Raymarine ™ Seatalk ™ autopilots
In this post we are going to see all the details of how to build a remote control for the autopilot of our boat. Both the more traditional version, with relays connected directly to the buttons on the display, and the good version that connects to the SeaTalk bus of our Raymarine pilot and works in the same way as the original Raymarine remote control.
Although ours is going to be a little better, since it also has a USB connection, the control box, which will allow us to control the autopilot also from the computer, mobile phone, tablet, etc.
You have all the details in the video on our channel:
In the video we present two options, one universal, although a little invasive, suitable for any brand of autopilot, and people who are a little brave, and another more conservative one for Raymarine pilots.
Option with relays connected to the buttons (The least good option)
This option is very simple to tell, although more difficult to do, we will only need, it is basically the same idea that we told in our episode to automate the switch panel of the boat https://youtu.be/gdB2Zn-vVw0 but applied to the autopilot buttons:
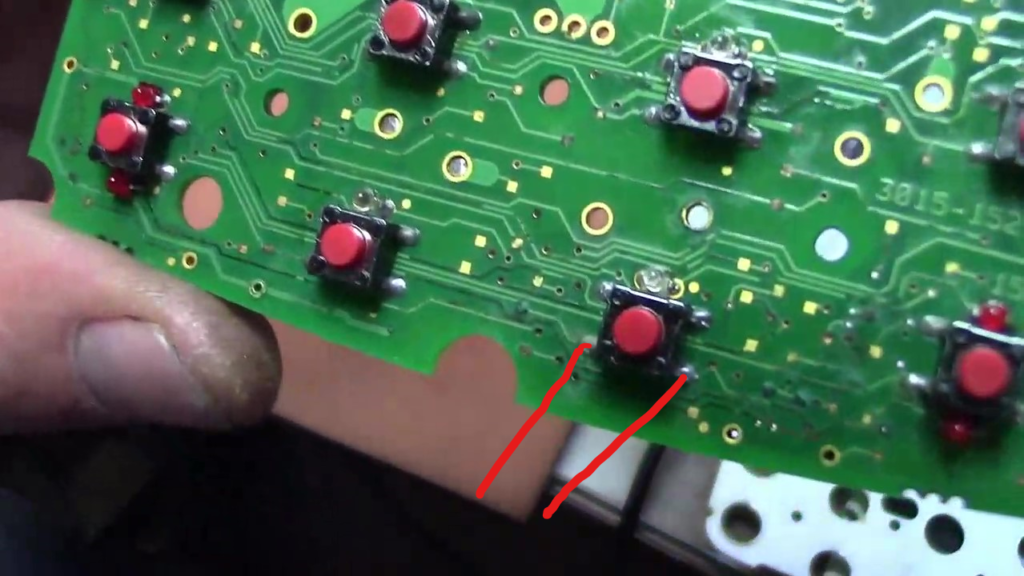
Simply, it is about opening the pilot and soldering a pair of cables in parallel to each button that we want to control, we will have to completely disassemble the display and find or make a hole in the casing to later remove the cables:
You just have to connect each pair of cables to the COM and NO of one of the relays in a relay box like this: https://s.click.aliexpress.com/e/_DBS57x7
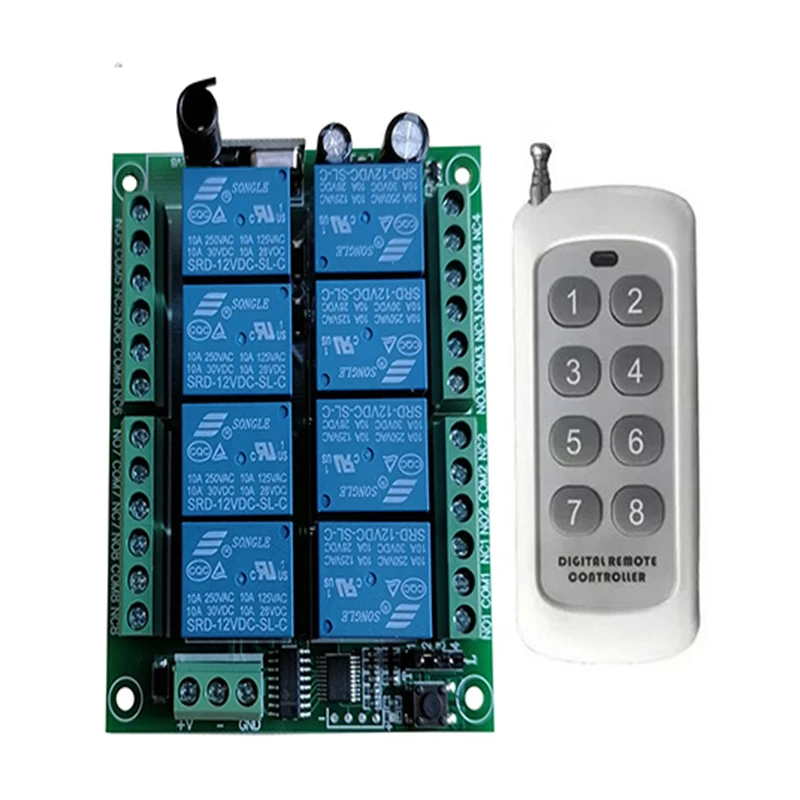
By putting it in “momentary” mode, you have everything solved. You can now use the remote control to operate the buttons on your pilot.
Seatalk option for Raymarine pilots (The good option)
As you see in the video, this is the best option, and the connection is identical to that of the original Raymarine pilot. You have to assemble a circuit with a few components and connect it to the Seatalk port of your autopilot, either through a Seatalk 1 connection in the older ones or with a Seatalk NG cable in the more modern ones, through its control screen. .
The circuit to be assembled is the following, you can find the complete project from which this data is taken here: https://github.com/AK-Homberger/Seatalk-Autopilot-Remote-Control
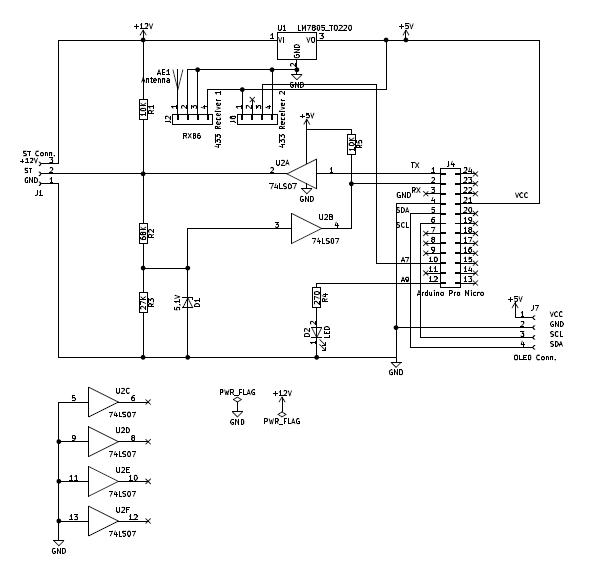
The components you will need are the following:
J1 Connector, AKL 101-03, 3-pin, 5.08 mm https://s.click.aliexpress.com/e/_DevgMwl
J2 RXB6 receiver 433 Mhz https://s.click.aliexpress.com/e/_DdNEWOl
J4 Arduino ProMicro Board, 5V https://s.click.aliexpress.com/e/_DeeR1ZR
U1 Regulator 7805 https://s.click.aliexpress.com/e/_DekGGiz
U2 Integrated 74LS07 DIP 14 https://s.click.aliexpress.com/e/_DeaqOmz
D1 Zener Diode 5.1V (0.5W) https://s.click.aliexpress.com/e/_DDmPWFn
D2 LED, rot, 3mm https://s.click.aliexpress.com/e/_DC7jMKH
R1,R5 10 KOhm Resistors, 1/4W https://s.click.aliexpress.com/e/_DFBBVhR
R2 68 KOhm Resistor, 1/4W https://s.click.aliexpress.com/e/_DFBBVhR
R3 27 KOhm Resistor, 1/4W https://s.click.aliexpress.com/e/_DFBBVhR
R4 270 Ohm Resistor, 1/4W https://s.click.aliexpress.com/e/_DFBBVhR
433mhz antenna https://s.click.aliexpress.com/e/_DmtTtuN
433Mhz 6-button remote control https://s.click.aliexpress.com/e/_DdJXlLj
Connectors for seatalk 2.8mm https://s.click.aliexpress.com/e/_DdZ6HLF
Cables
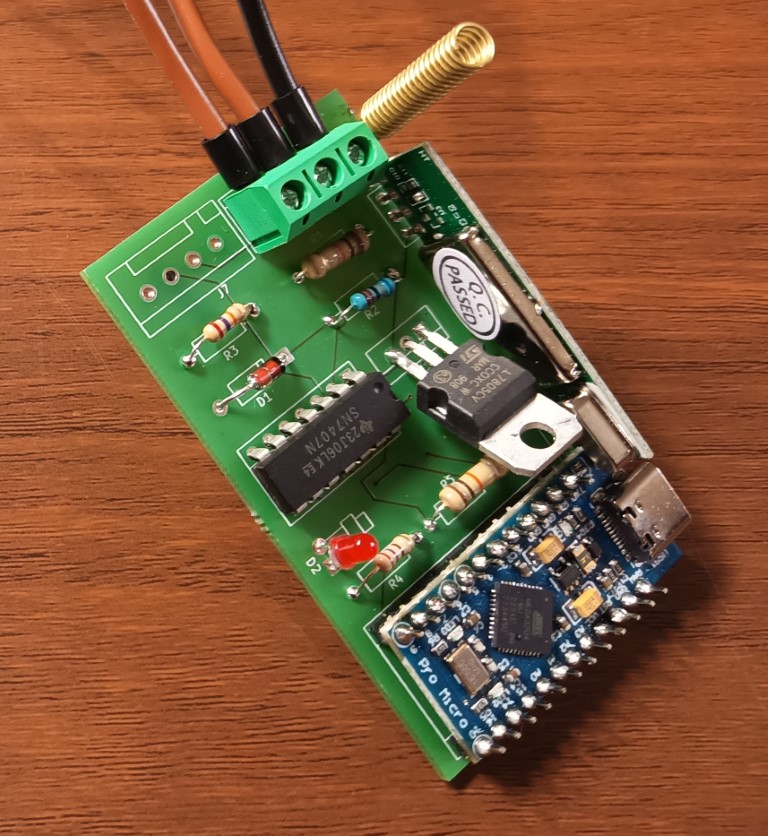
With all these components you are now ready to assemble the hardware, which you can do on a prototyping brick https://s.click.aliexpress.com/e/_DEyQ05b, following the schematic above, or ordering a PCB board specifies in which you can weld all the components in a more elegant way https://aisler.net/p/LCDCUVMF
You are going to have to buy a large quantity of many components because they do not sell them one at a time, and the PCB board at Aisler is going to cost you around 25 euros if you only buy one, so in our new online store we sell you, If you prefer, all the components are just right
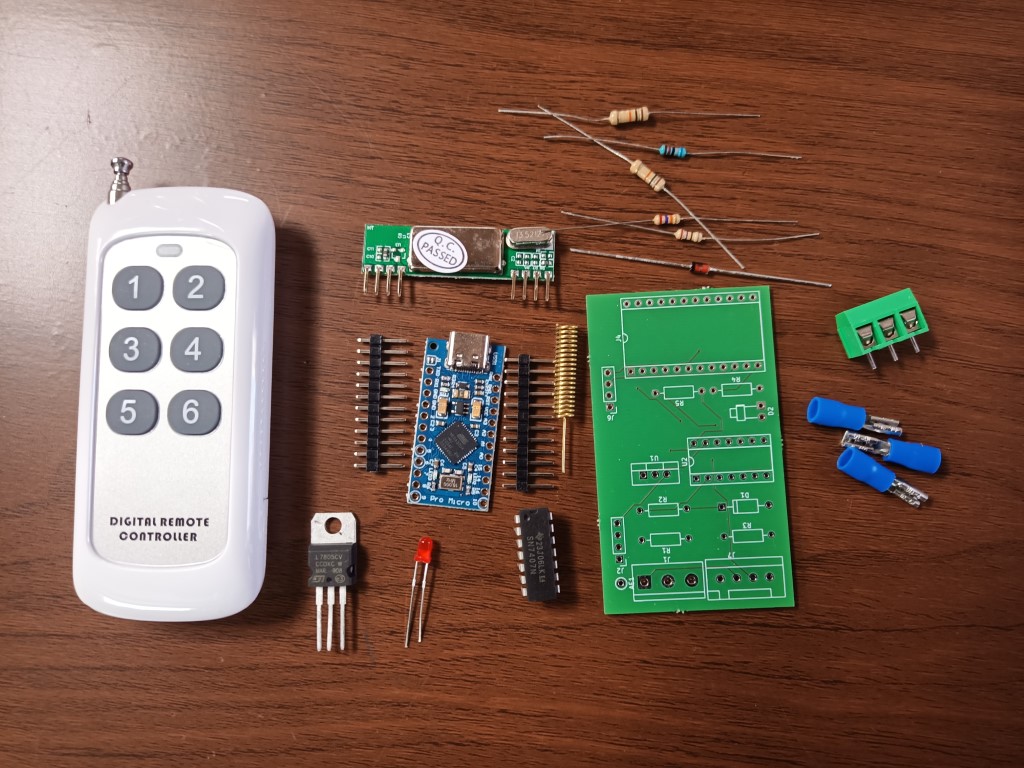
The result should be something like this:
And if you prefer that we do it for you, you also have in our online store all the pieces already assembled, programmed, put in a little box and with their personalized The Low Cost Sailor remote control.
Finally, all that remains is to program the Arduino following the steps that appear in the video, and for which you will need the following links:
Version 1.8.10 of the Arduino IDE: https://www.arduino.cc/en/software/OldSoftwareReleases
The source code of the GITLab project: https://github.com/AK-Homberger/Seatalk-Autopilot-Remote-Control
If you prefer, I have made an updated version of the firmware that you can also program or use as a base for yours, you have it here: https://www.thelowcostsailor.com/files2share/TLCSRemote433.ino
Of course, there is a third option which is to buy the original Raymarine controller, of course.
Finally, apart from USB, and actually any 433Mhz radio frequency remote control that you can imagine, like the one on the windlass, can be controlled with one of these Wi-Fi to RF converters that will allow you to operate it from your mobile, even when not on the boat. For example this one from sonoff: https://s.click.aliexpress.com/e/_DkhEQhT